Artisan Design Team Blog Hop – Curvy Celebrations

Hey Everyone

The 2020 Stampin’ Up! Artisan Design Team are back with an exciting hop for you. We’ve created projects featuring the Curvy Celebrations products. This new promotion features two early-release products from the January—June 2021 Mini Catalog, plus two exclusive products available for a limited time only!  As a demonstrator you are able to pre-order these products from 1st October 2020. If you’re like me, you’ll want to create projects as soon as possible to show your customers – so put in an order early to get creating.

Your customers can purchase Curvy Celebrations products beginning 3 November 2020. This promotion offers customers an opportunity to purchase early, gives them a first glance at the look and feel of the new mini catalog, and exclusive products perfect for Christmas crafting.

I’ve created a fun fold card that has both sides of the front panels cut with the Curvy Dies. I didn’t measure these, I just eye-balled what gap I would like and put it through my cutting machine.

The stamp set I’ve used for my card is the Quite Curvy Stamp Set. This stamp set combines perfectly with the Curvy Dies. I couldn’t resist adding two little birds (also from the Quite Curvy Stamp Set) as they are so darn cute!  The birds are stamped with Black Memento Ink and coloured really quickly with Crumb Cake and Highland Heather Blends.  The two little leaf stems are also made with the Curvy Dies.

I added a panel of Sahara Sand Cardstock to the left side of my card. This creates a flap that opens and also a base for the vines and leaves to be adhered to.  I used dimensionals to raise the vines up so that when the right side is closed, the vines hold the sentiment in place – you can see this in the photo above. I also added a strip of Whisper White 1/4″ Crinkled Seam Binding to tie both sides together.

The vine image has been stamped twice and cut with the matching die from the Curvy Dies set. I’ve coloured the vines in Soft Sea Foam and Light Old Olive Blends. The flowers that I’ve added to my vine leaves are also from the Quite Curvy Set. These flower images have been coloured with Highland Heather Blends, trimmed and added along the vine leaves to add some colour.

I hope you like what I’ve created. Make sure you check out the amazing projects the team have created.  I know after you see their creations, you’re going to want to get your hands on these products, like yesterday!
The next Artisan Design Team Member on the hop is the amazing Nina Waldschmidt.  Click here or on the button below to continue the hop.


2020 Artisan Design Team Roll

Caroline van der Straaten

Emma Goddard

Helene den Breejen

Jan Clothier

Lauren Alarid

Leah Fedynak

Manuela Geiswinkler

Marine Wiplier

Martha Groger

Martin Stone

Narelle Farrugia

Nina Waldschmidt

Rochelle Blok

Stesha Bloodhart

Tammy Wilson

Zsuzsanna Balazs

Products Used

Cardstock: Thick Whisper White Cardstock, Sahara Sand Cardstock

Stamp Set: Quite Curvy Stamp Set

Ink: Black Memento Ink, Sahara Sand Ink, Soft Sea Foam Blends, Highland Heather Blends, Crumb Cake Blends, Old Olive Blends

Other Products: Whisper White 1/4″ Crinkled Seam Binding Ribbon, Dimensionals, Metallic Pearls, Curvy Dies

Thanks for stopping by.

Cheers

Narelle
Just Add Ink #525

Hey Everyone

It’s Friday, so that means there’s a new challenge for you to play along with at Just Add Ink.  This week our challenge is:

We all have need for those thank you cards, so why don’t you play along and add a thank you card to your stash?

One of the ways we tend to say thank you is to give flowers, so I created a card full of bright flowers and a thank you sentiment. These beautiful flower images are from the So Much Love Stamp Set. I stamped the flower image twice and sat down with my Purple Posy and Highland Heather Blends.  The leaves have been coloured with the Soft Sea Foam Blends. I also took the Light Soft Sea Foam Blend and coloured the background Whisper White Cardstock to give it a watercoloured look.

The darker set of leaves are fussy cut from designer series paper.  I like the contrast of the darker leaves against the lightly coloured image ones. The pack of DSP I fussy cut the leaves from is called Forever Greenery Designer Series Paper pack.

Finally, I kept my sentiment simple by die cutting a Basic Black Cardstock sentiment cut with the Well Written Dies.


The team at Just Add Ink have created wonderful florally creations to inspire you. Head over to Just Add Ink and take a look.

Thanks for stopping by.

Cheers

Narelle

Global Design Project #260 & TGIF Challenge #283

Hey Everyone

Best part about being on holidays is, not only do I get to sleep in, I get to craft when I want!  The card I’m sharing today is for two challenges – this weeks CASE the Designer at  Global Design Project Challenge and Designer Take Over Challenge at TGIF Challenge.

The great thing about challenges is that they get you to create out of your comfort zone.  Ink blending used to scare me and I wouldn’t even bother trying it in case I messed it up. I told myself who cares if I messed it up, I could always bin it.

I have never tried blending the colours I’ve used on my card until today as I didn’t think I was much of an orange person. I think I might just be an orange lover now! The colours I’ve blended are Petal Pink, Mango Melody and Pumpkin Pie.

The peonies I’ve added to my card are from the Prized Peony Stamp Set. These peonies have been stamped in Black Memento Ink and coloured with a combination of Calypso Coral and Cajun Craze Blends.  The leaves I’ve layered on my card are stamped from the Forever Fern Stamp Set – these have been stamped with Pool Party Ink.

For the base of my card I added a rectangle of Sahara Sand Cardstock that has been embossed with the Brick & Mortar 3D Embossing Folder.  The Whisper White Cardstock panel under my flowers are leaves, has been punched with the Rectangular Postage Punch.  I’ve actually punched two of them to create a longer rectangle and hidden the join under the peonies. The fussy cut sentiment is from the matching stamp to the punch called Postage For You Stamp Set.

Three Champagne Basic Rhinestone Jewels were added to finish off my card.

Thanks for stopping by.

Cheers

Narelle

Freshly Made Sketches #455

Hey Everyone

We have a new challenge for you to play along with at Freshly Made Sketches.  This week our sketch has been designed by the super talented and oh so lovely Jen Mitchell.  Make sure you pop over to her blog and see her gorgeous creations!

I’m continuing with my Christmas card making. I’ve taken the Forever Fern Stamp Set and made it work for a Christmas card.  The colours I’ve stamped my leaves in are Basic Gray, Gray Granite and Mint Macaron Inks. Once the leaves were fussycut, I layered them over a Gold Hoop Embellishment.  I then took some Braided Linen Trim and held it in place with some Glue Dots.  Three little Gold Metallic Pearls were placed on my card to add some bling.

The team at Freshly Made Sketches have created awesome cards that will no doubt inspire you. Head over to the challenge and check them out.

Thanks for stopping by.

Cheers

Narelle

CAS(E) This Sketch #391

Hey Everyone

I’ve been gettin snapchats all morning from my family, who only live an hour away from me, of snow falling.  While I’m sitting here in a t-shirt…… I’m so jealous as we don’t get snow here in the city I live in…. So instead of feeling sorry for myself, I went out to my craft room and made a card for this weeks sketch challenge at CAS(E) this Sketch.

I decided to start my card with the designer series paper that reminded me of snow falling and my card went from there.  The DSP I’ve used is from a pack called Snowflake Splendor Designer Series Paper. I stamped two bow images from the Gift Wrapped Stamp Set and coloured them with a combination of Pool Party and Bermuda Bay Blends.  The leaves I’ve added to my card have been cut with the Forever Flourishing Dies – there are two of them on this card.

Once I layered everything around the sentiment (also from the Gift Wrapped Stamp Set) I decided to stamp two little tags also from the same set  I coloured one with the Dark Pool Party Blend and the other was stamped with the holly image in the set.These were then fussy cut and layered next to the sentiment.

Thanks for stopping by.

Cheers

Narelle

Freshly Made Sketches #454

Hey Everyone

It’s Wednesday so that means a new challenge at Freshly Made Sketches.  Our sketch this week has been designed by the wonderfully talented Jacquie Southas.

I’m currently on annual leave and spent pretty much all of Monday chatting to friends around the world. When I said I needed to create a card with a centre panel, my fabulously talented NZer friend Paula Dobson gave me the idea to create an ombre effect panel. I’m not much of a technique cardmaker, but I decided to give it a go.  I took my dauber and some Pool Party and Bermuda Bay Inks and went to town with daubing. It’s amazing what you can do when you have extra time to play.

The Snow Wonder Stamp Set had yet to see ink, until this card.  I love this snowman because of the vintage feel of the images. My snowman was given a bit of colour with my Smoky Slate Blends and the hat and scarf with Pool Party and Bermuda Bay Blends.  The trees were then stamped in Bermuda Bay Ink. Once I cut them out with the matching Snow Time Dies I then added a quick shadow with my Dark Smoky Slate to the layers on the trees to create depth.

The sentiment I’ve added is also from the Snow Wonder Stamp Set. This was stamped in Black Memento Ink and trimmed to fit the card.  Three Blue Adhesive-Backed Gems were added because you can’t have an even number of them on your card. I matted my panel with some Bermuda Bay Cardstock on an angle as I felt the white on white cardstock was a bit lacking.

The team at Freshly Made Sketches have designed fabulous cards using the sketch. Pop over to the challenge and see what they’ve created.

Thanks for stopping by.

Cheers

Narelle

Artisan Design Team Blog Hop – Poinsettia Place Suite

Hey Everyone

Welcome to the latest Stampin’ Up! Artisan Design Team Blog Hop.  This month we are showcasing projects we’ve made with products from the Poinsettia Place Suite.

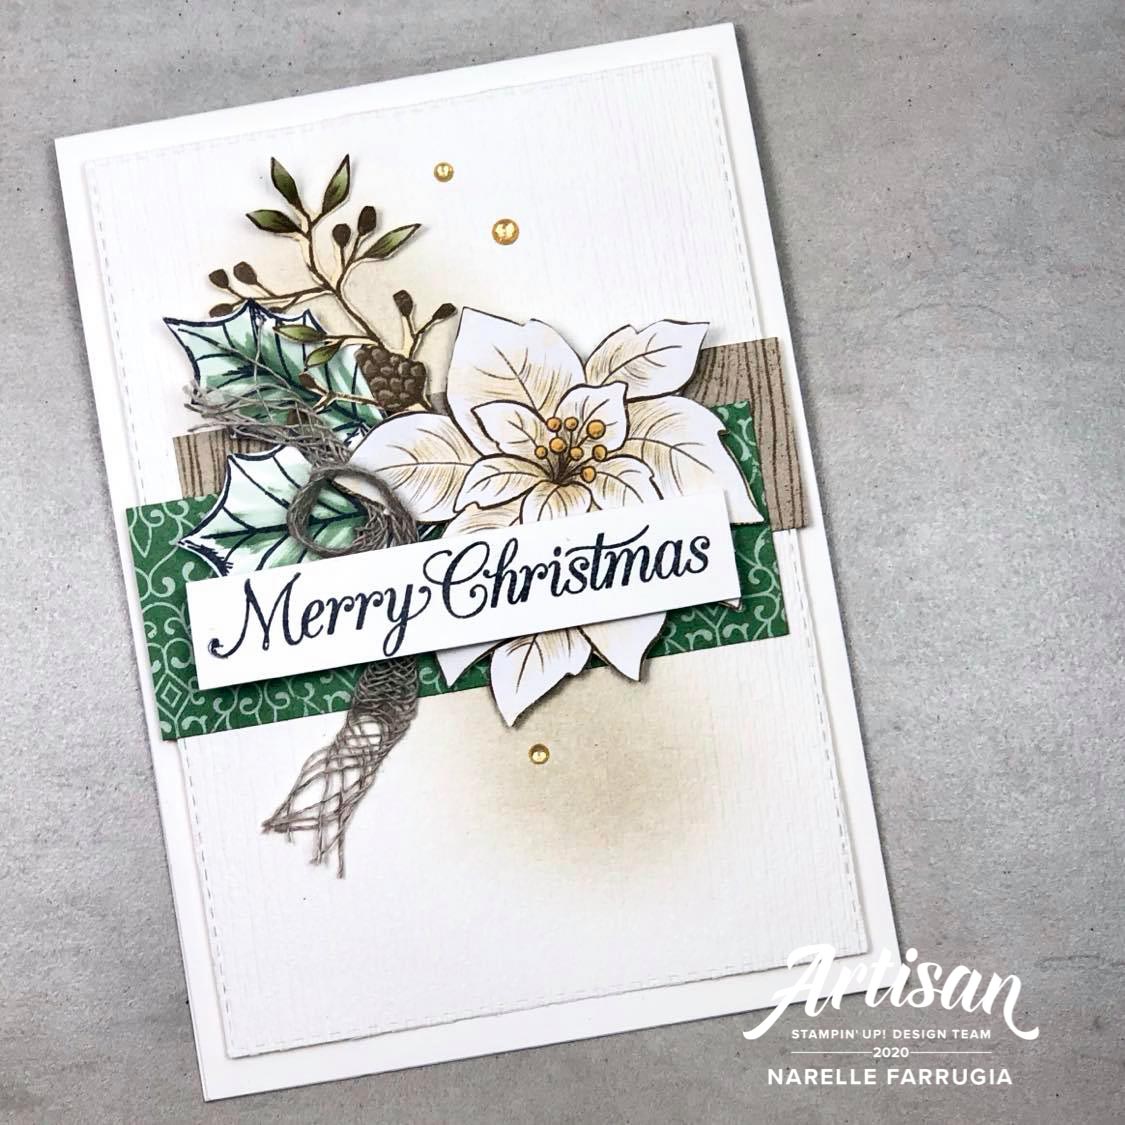
All of the products in this suite are AMAZING! I’ve been making a heap of cards with the Poinsettia Place Stamp Set, so this time I wanted to show off the pretty and perfectly coloured poinsettias that you can trim from the Poinsettia Place Designer Series Paper pack.  I also trimmed the leafy stem and pine cones images from the DSP and adhered them to my card.  The large leaves that I’ve paired with my poinsettia are stamped with the leaf images from the Poinsettia Place Stamp Set. They’ve been coloured with my Mint Macaron Blends.

I cut the card base with a Rectangle Stitched Die and daubed Sahara Sand Ink on the Thick Whisper White Cardstock.To add some texture, I ran this piece through my embossing machine with the Subtle 3D Embossing Folder. I then added a combination of papers from the Poinsettia Place DSP pack. Once I was happy with the layering of my poinsettias and sentiment, I then took my favourite Braided Linen Thread and layered it amongst the flower and leaves. Three Gold Glitter Enamel Dots finished off this card.

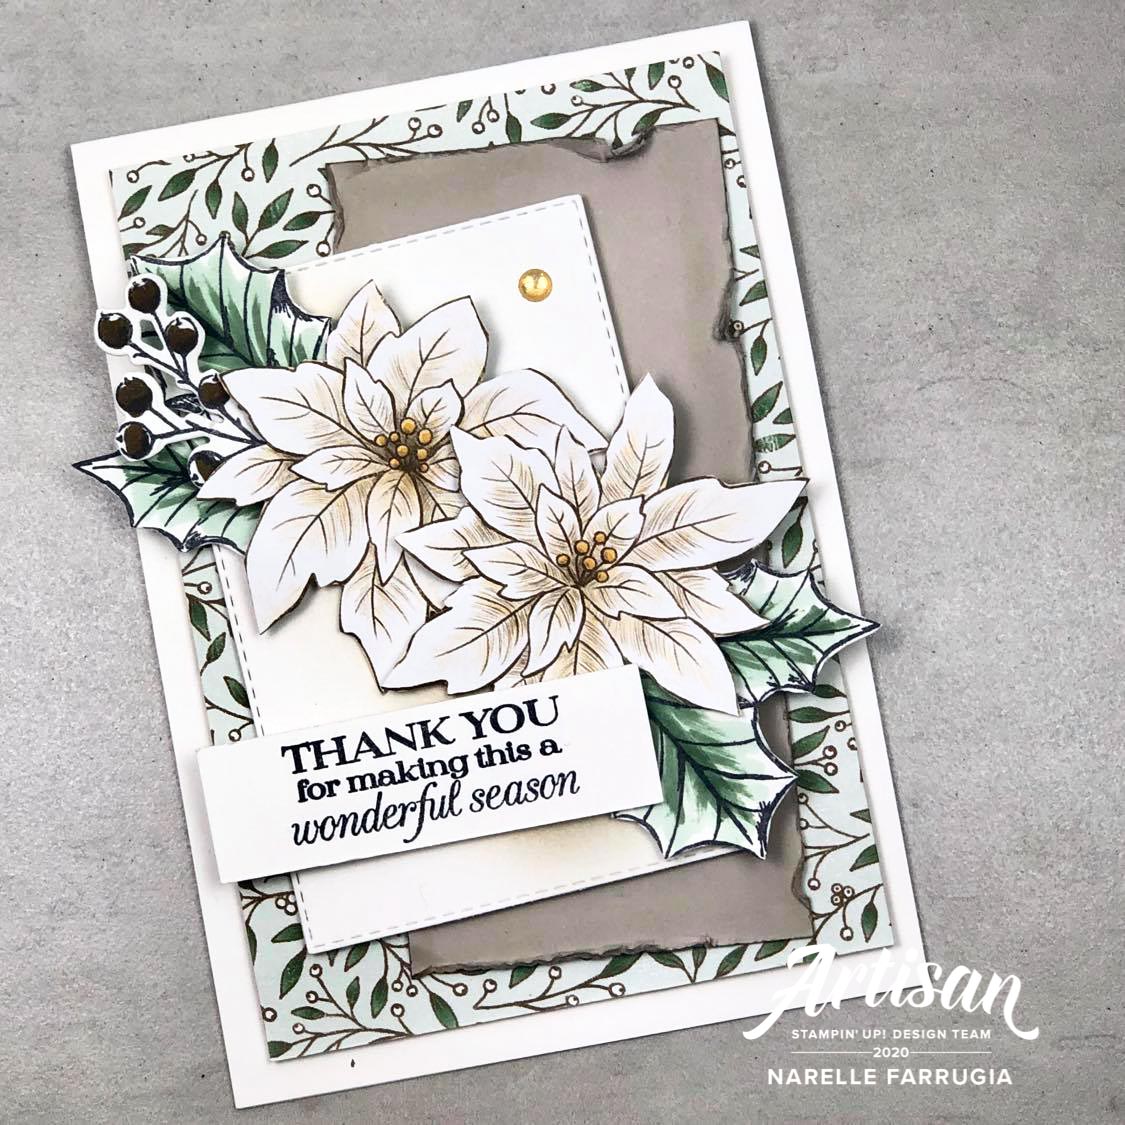
Like my first card, my poinsettias are trimmed from the Poinsettia Place Designer Series Paper and the leaves are stamped from the Poinsettia Petals Stamp Set.  For this card, I added some stamped holly berries that have been cut with the Poinsettia Dies.

The DSP I’ve added to the base of my card is also from the Poinsettia Place Designer Series Paper pack. I took a piece of Sahara Sand Cardstock and daubed the edges before using my fingernail to rough up the cardstock.  One Gold Enamel Glimmer Dot was added to this card.

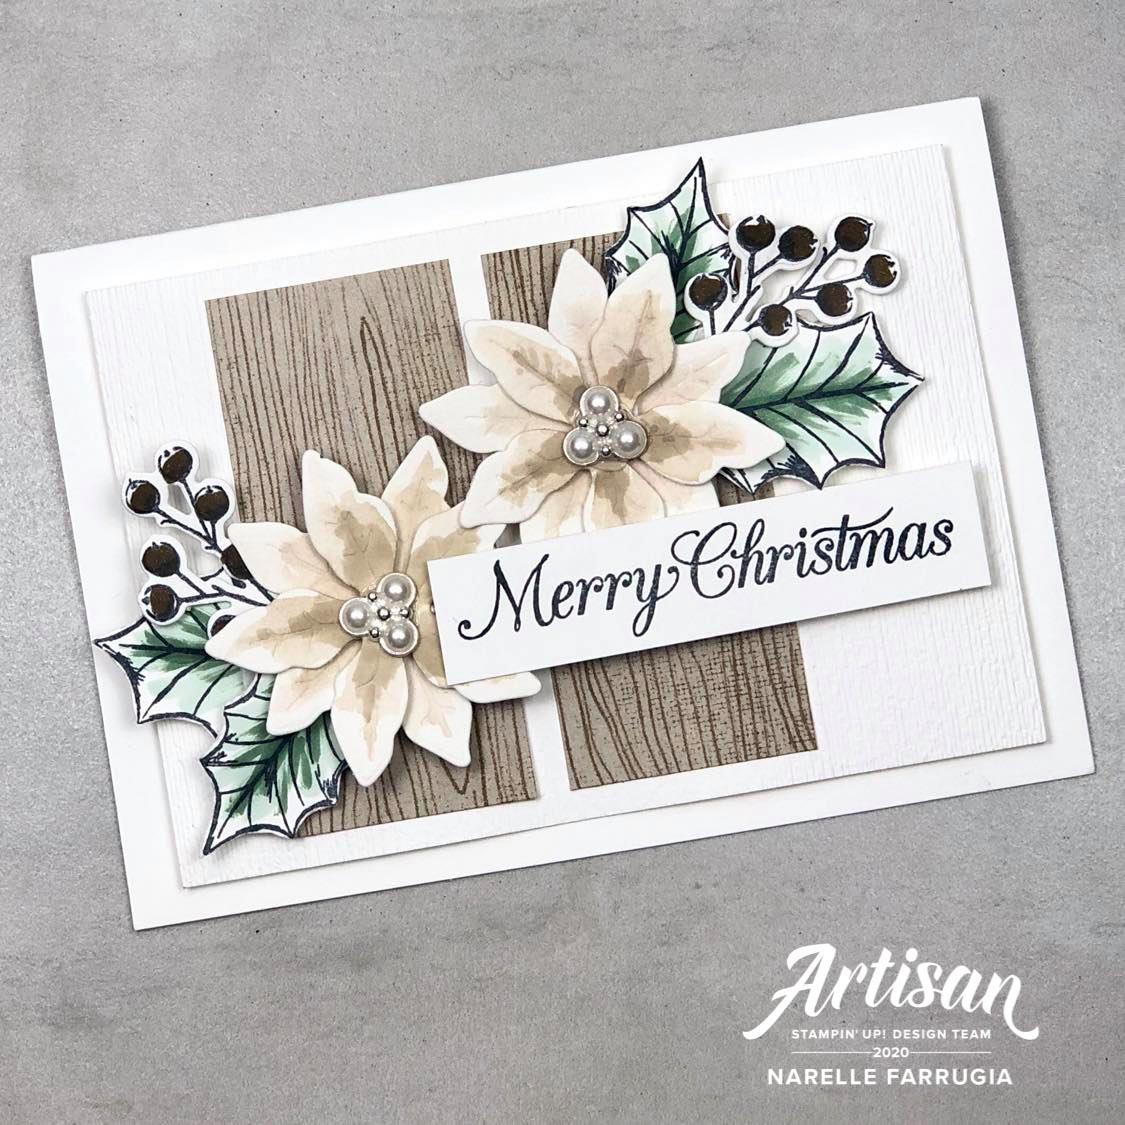
For my third card, I created my own poinsettia’s by cutting some poinsettia die cuts with the Poinsettia Dies. I took my Water Painter and some Sahara Sand Ink and added colour to the die cuts, adding a darker shade to the centre of the flowers.  I couldn’t resist adhering Beaded Pearls to the centre of the die cuts to make them pretty and bling-y. I kept my layering simple with this card to let the poinsettias shine.

I hope you like the projects I’ve created with these products. Make sure you check out all the wonderful projects the team have created. The next hop along the way is my very talented friend Nina Waldschmidt with her creations. Click here to take you to her blog or on the button below.

2020 Artisan Design Team Roll

Caroline van der Straaten

Emma Goddard

Helene den Breejen

Jan Clothier

Lauren Alarid

Leah Fedynak

Manuela Geiswinkler

Marine Wiplier

Martha Groger

Martin Stone

Narelle Farrugia

Nina Waldschmidt

Rochelle Blok

Stesha Bloodhart

Tammy Wilson

Zsuzsanna Balazs

Products Used

Cardstock: Thick Whisper White Cardstock, Sahara Sand Cardstock, Poinsettia Place Designer Series Paper

Stamp Set: Poinsettia Petals

Ink: Black Memento Ink, Sahara Sand Ink, Soft Suede Ink

Other Products: Poinsettia Dies, Braided Linen Thread, Beaded Pearls, Mint Macaron Blends, Gold Glitter Enamel Dots, Rectangle Stitched Dies, Subtle 3D Embossing Folder

Thanks for stopping by.

Cheers

Narelle

Just Add Ink #523

Hey Everyone

It’s time for a new challenge at Just Add Ink. This week our challenge is to:

When I get a challenge like this, I think I’m going to get all creative choosing something like a technique I’ve never tried before, but usually end up going with the obvious – using a stamp set that starts with the letter A….

The stamp set I’ve used for my card is called All Things Fabulous. The pretty flowers are stamped in Roccco Rose Ink and then Cherry Cobbler Ink over the top to create definition in the centre of the flowers. The leaves have been stamped with a combination of Soft Sea Foam and Pear Pizzazz Inks.

The lattice effect background is from the Forever Gold Laser-Effect Specialty Paper. I’ve turned the gold paper over to expose the white back to it. I then used a couple of the gold leaves to add to my layering as well as some gold twine from the Forever Greenery Trim Combo pack. Three white Elegant Faceted Gems were used to add a pretty touch as well as make sure the lattice piece stayed in place.

The team at Just Add Ink have created wonderful cards for the challenge, head over to Just Add Ink and see what they’ve created.

Thanks for stopping by.

Cheers

Narelle

Freshly Made Sketches #453

Hey Everyone

I’m a little late posting this! There’s a new sketch at Freshly Made Sketches.  This week our sketch hostess is the fabulously talented Judy Rozema.

Stampin’ Up!s In The Pines Bundle got some ink this week.  The large trees I’ve used on the In The Pines Stamp Set have been stamped in Black Memento Ink and the centre has been stamped with Bermuda Bay and Pool Party Inks.  The little trees were coloured with Pool Party Ink and cut with the Pine Wood Dies.

The Pine Wood Dies from the bundle created the background curve to my stitched circle die cut. I then added three little gems because I’m a bling-y girl.

The team at Freshly Made Sketches have made awesome cards with the sketch. Pop over to the challenge and see what they’ve created.

Thanks for stopping by.

Cheers

Narelle

Freshly Made Sketches #452

Hey Everyone

There’s a new sketch over at Freshly Made Sketches for you to play along with.  Our sketch designer is the amazingly talented Amy O’Neill. Amy’s cards are always full of fabulous colours and wonderful detail.

The sketch made me think of using flowers floating at the two corners of the card.  The flowers and sentiment I’ve used on my card are from the So Much Love Stamp Set. I’ve coloured my flowers with a combination of the yellow blends.  The larger flower on the bottom of the card has been coloured with the darkest of my blends – Mango Melody. I added some light Pool Party Ink daubing around the top flower all the way to the bottom flower to add some softness the white background.

The team at Freshly Made Sketches have made gorgeous cards with Amy’s sketch. Pop over to the challenge and see what they’ve created.

Thanks for stopping by.

Cheers

Narelle